Relayer Quickstart
You can spin up the Relayer in a few simple commands. This guide will walk you through the steps to get started.
By the end of this guide, you will have a running relayer that is publicly accessible via HTTPS endpoint behind a reverse proxy.
Prerequisites
Before you begin, ensure that you have the following prerequisites:
- A Unix-based operating system (Linux, macOS, WSL, etc.)
- curl
- Hardware requirements:
- Minimum 2 cores CPU
- 4 GB RAM
- 50 GB free disk space (preferably SSD)
- A publicly accessible domain name (optional, but recommended)
Installation
- Open your terminal and run the following command to download the latest version of the relayer:
curl -fsSL https://git.io/get-webb-relayer.sh | shThe script will download the relayer binary (or update it if it already exists) and place it in your $HOME/.webb directory. The script will also suggest adding the directory to your PATH environment variable.
Alternatively, if you wish to download a specific version of the relayer, run the following command:
curl -fsSL https://git.io/get-webb-relayer.sh | sh -s <version>This will download the relayer binary (or update it if it already exists) and place it in your $HOME/.webb directory. The script
will also suggest adding the directory to your PATH environment variable.
Verify Installation
- Verify that the relayer was installed successfully by running the following command:
~/.webb/webb-relayer --versionConfiguration
Before running the relayer, you will need to configure it. The relayer could be configured by using TOML or JSON files along with environment variables.
The Relayer will look for configuration files in the default locations, but you can also specify the path to the configuration file using the --config flag.
-
Default locations for configuration files:
$HOME/.config/webb-relayer/(Linux)$HOME/Library/Application Support/tools.webb.webb-relayer/(macOS)
For simplicity, we will use the TOML configuration file format in this guide and we will place the configuration file in the default locations.
Download the Example Configuration File
To download the example configuration file, run the following command:
curl -fsSL https://raw.githubusercontent.com/webb-tools/relayer/main/config/example/config.toml -o ~/.config/webb-relayer/config.tomlConfigure the Relayer
Open the configuration file in your favorite text editor and take a look at the configuration options. The configuration file is well-documented and should be self-explanatory.
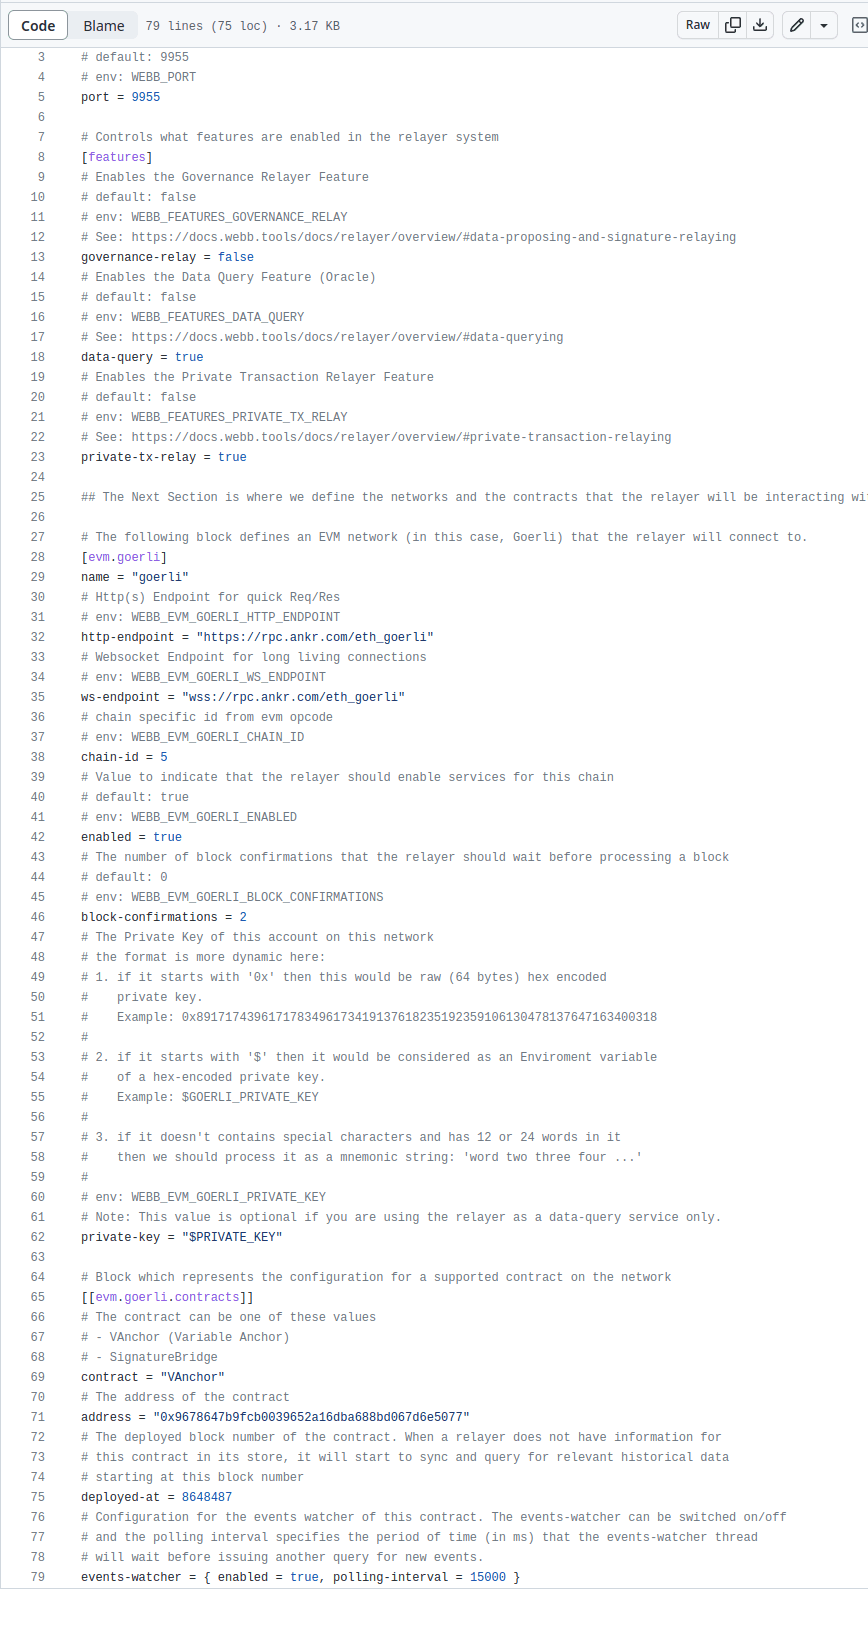
Environment Variables
The relayer can also be configured using environment variables. The environment variables will override the values in the configuration file.
For example, if you want to override the port value in the configuration file, you can set the WEBB_PORT environment variable.
For example, to modify the port value using the environment variable, you can do the following:
export WEBB_PORT=9955For our example configuration file, the following environment variables are required:
PRIVATE_KEY- The private key of the relayer. This can be a hex-encoded private key or a mnemonic phrase.
create a new file called .env in the same directory as your current directory and add the following line:
# Hex-encoded private for the relayer (64 characters) prefixed with 0x
PRIVATE_KEY="0x..."
save the file and exit the editor.
Running the Relayer
To run the relayer, run the following command:
~/.webb/webb-relayer -vvvThe --tmp flag will start the relayer with a temporary database. This is useful for testing, but you should not use this flag in production.
You should see the following output:
 2023-03-14T14:13:08.315804Z DEBUG webb_relayer_config::cli: Getting default dirs for webb relayer
    at crates/relayer-config/src/cli.rs:61

  2023-03-14T14:13:08.316568Z DEBUG webb_relayer_config::cli: Using temp dir for store
    at crates/relayer-config/src/cli.rs:131

  2023-03-14T14:13:08.352455Z  INFO webb_relayer::service: Starting the server on 0.0.0.0:9955
    at services/webb-relayer/src/service.rs:141

  2023-03-14T14:13:08.355367Z DEBUG webb_relayer::service: Starting Background Services for (goerli) chain.
    at services/webb-relayer/src/service.rs:172

  2023-03-14T14:13:08.880637Z  WARN webb_relayer::service: Tx Queue disabled for (5)
    at services/webb-relayer/src/service.rs:1053

  2023-03-14T14:13:08.880641Z DEBUG webb_relayer::service: VAnchor events watcher for (0x9678…5077) Started.
    at services/webb-relayer/src/service.rs:648

  2023-03-14T14:13:08.880660Z DEBUG webb_probe: kind: lifecycle, started: true
    at services/webb-relayer/src/main.rs:80

  2023-03-14T14:13:08.880666Z  WARN webb_relayer::service: Governance relaying is not enabled for relayer
    at services/webb-relayer/src/service.rs:1197

  2023-03-14T14:13:16.286918Z  INFO webb_event_watcher_traits::evm::event_watcher: 🔄 #8650987 of #8654131 (99.9637%)
    at crates/event-watcher-traits/src/evm/event_watcher.rs:218
    in webb_event_watcher_traits::evm::event_watcher::run with chain_id: Ok(5), address: 0x9678…5077, tag: VAnchor Contract Watcher

  2023-03-14T14:13:23.496016Z  INFO webb_event_watcher_traits::evm::event_watcher: 🔄 #8653887 of #8654131 (99.9972%)
    at crates/event-watcher-traits/src/evm/event_watcher.rs:218
    in webb_event_watcher_traits::evm::event_watcher::run with chain_id: Ok(5), address: 0x9678…5077, tag: VAnchor Contract Watcher

  2023-03-14T14:13:39.302727Z  INFO webb_event_watcher_traits::evm::event_watcher: 🔄 #8654129 of #8654131 (100.0000%)
    at crates/event-watcher-traits/src/evm/event_watcher.rs:218
    in webb_event_watcher_traits::evm::event_watcher::run with chain_id: Ok(5), address: 0x9678…5077, tag: VAnchor Contract Watcher
Verifying the Relayer is Running
To verify that the relayer is running, you can use the /api/v1/ip endpoint:
curl http://localhost:9955/api/v1/ipYou should see the following output:
{"ip":"<your-public-ip>"}Congratulations! You have successfully started the relayer.
What's Next?
Now that you have the relayer running, you need to run it behind a reverse proxy. You can use Caddy (opens in a new tab) or Nginx (opens in a new tab) for this.
Once you have the relayer running behind a reverse proxy, you should be able to access it from your domain name. For example, if you are running the relayer on relayer.example.com, you should be able to access the relayer at https://relayer.example.com/api/v1/ip.
After that you may like to configure the relayer by supporting more chains. You can find more information about that in our Relayer Configuration examples (opens in a new tab).
Dapp Integration
After completing the above steps, submit a PR with changes for your https endpoint in the Webb Dapp (opens in a new tab) repo.